Flightradar24にADS-B情報をフィードするにあたり、正確なアンテナの位置情報を確認する方法を紹介します。
記事の目次
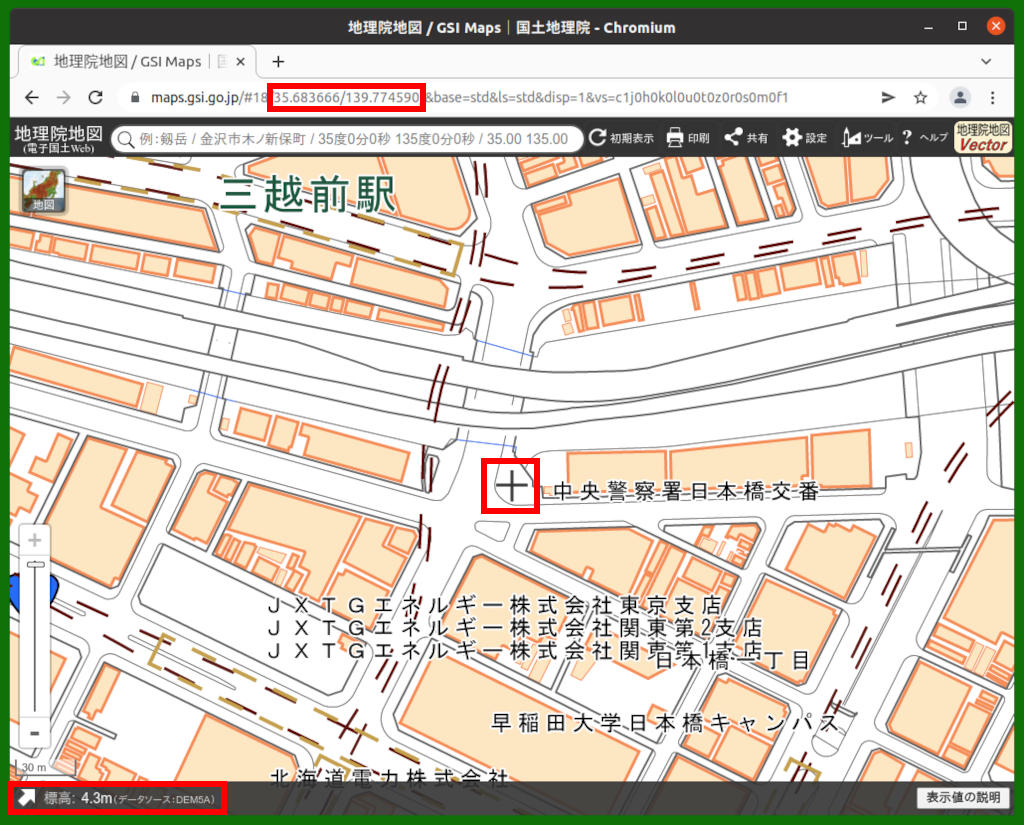
国土地理院の地図を利用して地面の位置情報を確認する!
搭載とのおすすめは、国土地理院の地図を利用して地面の位置情報を確認する方法です。この方法を使えば、正確な緯度、経度そして地面の高度の情報を得ることができます。
この地図の使い方にはポイントがあり、マップの方を動かして知りたい地点の位置を地図中央の「+」に合わせます。緯度と経度はURLに、高度は左下に表示されます。
Flightradar24のフィーダーのアンテナの高度を求める!
国土地理院の地図からわかる高度は地面の高度になるので、地面の高度にアンテナを設置した高さを加算します。概算にはなりますが、マンションなどの場合は、1階分の高さを3mとすると計算が容易と思います。Flightradar24では、フィートの単位で入力するので、メートルからフィートに換算します。
Flightradar24のフィーダーの位置情報を設定し直す!
位置情報を設定済みの場合は、以下のコマンドでFlightradar24のフィーダの位置情報を設定し直します。設定し直す前に、アカウントのメールアドレスとSharing Keyを確認しておきましょう。
$ sudo fr24feed --signup
...

Welcome to the FR24 Decoder/Feeder sign up wizard!

Before you continue please make sure that:

 1 - Your ADS-B receiver is connected to this computer or is accessible over network
 2 - You know your antenna's latitude/longitude up to 4 decimal points and the altitude in feet
 3 - You have a working email address that will be used to contact you
 4 - fr24feed service is stopped. If not, please run: sudo systemctl stop fr24feed

To terminate - press Ctrl+C at any point


Step 1.1 - Enter your email address (username@domain.tld)
$:XXXX@XXXX.XX

Step 1.2 - If you used to feed FR24 with ADS-B data before, enter your sharing key.
If you don't remember your sharing key, you can find it in your account on the website under "My data sharing".
https://www.Flightradar24.com/account/data-sharing

Otherwise leave this field empty and continue.
$:XXXXXXXXXXXXXXXX

Verifying sharing key...OK


Step 1.3 - Would you like to participate in MLAT calculations? (yes/no)$:yes

IMPORTANT: For MLAT calculations the antenna's location should be entered very precise!

Step 3.A - Enter antenna's latitude (DD.DDDD)
$:XX.XXXX

Step 3.B - Enter antenna's longitude (DDD.DDDD)
$:XXX.XXXX

Step 3.C - Enter antenna's altitude above the sea level (in feet)
$:XX

Using latitude: 35.4902, longitude: 139.6513, altitude: 72ft above sea level

We have detected that you already have a dump1090 instance running. We can therefore automatically configure the FR24 feeder to use existing receiver configuration, or you can manually configure all the parameters.

Would you like to use autoconfig (*yes*/no)$:no

Step 4.1 - Receiver selection (in order to run MLAT please use DVB-T stick with dump1090 utility bundled with fr24feed):

 1 - DVBT Stick (USB)
 -----------------------------------------------------
 2 - SBS1/SBS1er (USB/Network)
 3 - SBS3 (USB/Network)
 4 - ModeS Beast (USB/Network)
 5 - AVR Compatible (DVBT over network, etc)
 6 - microADSB (USB/Network)
 7 - SBSx via Basestation (localhost:30006)


Enter your receiver type (1-7)$:1
Checking for dump1090...FOUND

Step 4.3 - Enter your additional dump1090 arguments or leave empty
$:

Step 5.1 - Would you like to enable RAW data feed on port 30002 (yes/no)$:yes

Step 5.2 - Would you like to enable Basestation data feed on port 30003 (yes/no)$:yes

Step 6 - Please select desired logfile mode:
 0 -  Disabled
 1 -  48 hour, 24h rotation
 2 -  72 hour, 24h rotation
Select logfile mode (0-2)$:2

Saving settings to /etc/fr24feed.ini...OK
Settings saved, please run "sudo systemctl
指示通り、fr24feedのサービスを再起動します。
$ sudo systemctl restart fr24feed
おわりに
スマホのアプリを使用しても容易に位置情報を取得できますが、GPSの精度に不安があったり、高さの情報が地面の位置情報のみであったりするため、位置情報の求め方を整理してみました。
関連記事

関連書籍(Amazon)
